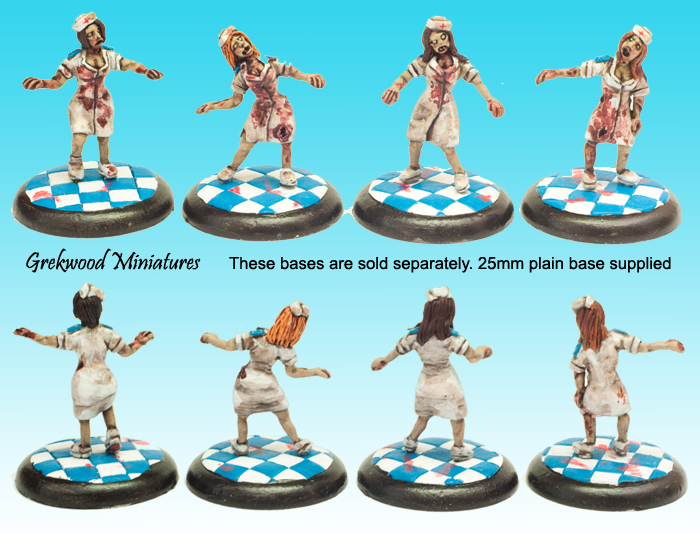
Grekwood Miniatures

Showing posts with label apocalypse. Show all posts

Tuesday, 20 May 2014

Ritual/Summoning Circles

Hi everyone,

It's been a while again since I wrote a blog. I don't really come here much any more as I get occupied with Facebook or other matters, so apologies for not "getting involved" with things.

I uploaded a few more items to our website. So here they are:

Ritual Circles (http://www.grekwoodminiatures.co.uk/RitualCircles.php)
These come in 3 sizes (S M and L), the smaller ones are perfect for markers or for placing underneath a characters base. The M and L ones are perfect as more of a centrepiece or something eye catching on a table. They can be used to summon demons/spirits, cast spells, make sacrifices, or even used as teleportation devices to get from one realm to another... or just to get from one part of the table to another.

For all you zombie fans, maybe it could be a place where the darkness originated and spawns from?!

So anyway, here's some photos (Click them for size info and bigger pictures).


Clear Police Box and Solid Post Box (http://www.grekwoodminiatures.co.uk/StreetFeatures.php)
Below is a clear resin police box. The clear resin means the it can be painted and the windows can be left clear to give a "real" glass effect.

Also below is a nicely detailed UK post box! It's a perfect combo along side out telephone box, so go check it all out!


Cheers guys!

Saturday, 16 November 2013

Setting up: Using Grekwood Zombie Rules

Some of you may know that we (Grekwood Minis) have created some zombie rules. So last week we tested them out and played a demo game. I will use this post to explain how the demo game went, and how we set everything up!

So here we go, (Click all images to zoom)
 
The first thing we did was lay out the game surface (right), then select the type of game we were going to play. This may sound a reverse way of doing things, but it actually stops you introducing preconceived ideas into your layout as you have no idea what scenario you’re going to play during set-up.

We wanted to keep things random, so we rolled to see which of the five game styles we would play. We got the Salvage and Scavenging scenario. Therefore the aim seemed quite simple. We had placed our hospital building PDF in the top right corner of the table so it seemed logical to mount a scavenger raid on it.

Our earlier helicopter recon showed the ‘Zed Zone’ to have a low level of activity and since the copter was low on fuel we’d have to go in by ground transport. Since we’ve played a couple of games before we knew that the chances of success for our Plan A was usually quite low (we like a challenge!), so we always do a back-up plan. So Plan B was to visit the local store “Greksco”, grab a few beers, toilet rolls, toothpaste and some tins of grub if we get blocked in!

Ok, so the next step was to decide how many player characters [survivors] we were going to have. We chose four, two men, two women (we wanted to keep things even!). So here's a photo of them: 

We did all the roles for skill level, health etc and we came up with the following: Rather than giving all their stats, I've summed it up:

Baseball Ben is the best fighter and most skilled but his health and morale are basically average.
Adele From Admin is probably the number two as she’s above average in almost all respects, being the fittest of the group with an above average morale.
Xavier is the ‘extrovert’ of the group. No-one knows his real name, and no-one cares to push the issue. He’s the third most skilful being a tad above average, but despite his flamboyant nature he’s suffering some chronic health issues which means he doesn't like to close on the ‘zeds’, preferring to fight at a distance, as a result he has the lowest morale of the group.
Gina ‘two guns’ is pretty much an average type but her ego is big, giving her the highest morale of all, she’s a girl with attitude and wants to prove she’s tougher than the rest. 

Now that was done, we needed to put the ‘team’ in place. Since the prime objective is to reach the hospital, we inserted the group on the left edge of the playing surface. Like I said, we wanted to make things difficult and that’s the furthest away from our objective. From looking at the table, we were able to identify four insertion points here – two roads [A & C] and two alleyways [B & D]. So we rolled the die and found they enter at C, allowing them to drive the vehicle onto the table (Cool vehicle shown below).


Our next problem was to work out where the ‘zeds’ are and how many. So we do our rolls and find we have 20 ‘zeds’ on the access/entry points and a further 28 on the ‘grid’ (rest of the playing surface). Luckily we got some really low rolls here which meant there weren't many ‘zeds’ on table at the start…always good news! The ‘zeds’ have five entry points [1-5], they can’t use alley B as it’s been fenced off and they won’t get through that way. Also they can’t use the PC insertion point either (aka C).

So rolling on the Zombie reinforcement table (in our rules) we rolled a 6 which means the ‘zeds’ appear at three separate entry locations. Rolling for these we find they are points 2, 4 and 4 again. With 20 ‘zeds’ we split these between the three entry points as best we could, giving 7 at point 2 and 13 at point 4… umm maybe there’s a party or something happening?! Here's a photo:


In the photo, entry point 4 shows 16 zombies... (it's a mistake, we removed 3 after this photo)


Next we have 28 ‘zeds’ to go on the ‘grid’. The grid is formed by the basic tile system we use [at Grekwood Minis]. These tiles form a visible grid on the playing surface and by using a ‘battleships or chess board’ type system where we letter or number the game area edges, we can identify any individual 6x6 tile.

Our table was 8 tiles by 13, but we ignored the far right column as it was far away from our entry point and makes rolls easier as most gamers probably have a 1d12 [if not a random number generator on the internet will do the roll for you]. We used a 1d8 for the depth (8 tiles) and 1d12 for the front edge of our area (12 tiles). Once we pinpointed a tile, we rolled a 1d6 [for the number of ‘zeds’ present per tile) and placed the resulting number on that tile. We did this until we used up all 28 zeds!
  
When a zombie appeared on a tile occupied by a building, we placed them on the roof to indicate their position [this is for illustrative purposes –in a game their positions would simply be noted by the games master].

Okie dokie, that’s the set up done. It sounds long but I wanted to explain it well as this might be used for reference if people used our rules.


My next post will have the game in it…so stay tuned!

Monday, 23 September 2013

New Zombies, Painted Zombies, Armour, and a Manikin.

Hi everyone,

I've been a bit quiet around here so here's a large-ish blog for you :)

Miniature Stuff
The "Costume" zombies are now available on the website!! Yay! I was excited when sculpting these as they were kind of fun. I'm currently in the process of painting some up for the website, and here is a WIP photo of what I have done today :)


I have also been painting up all of the WGF zombies over the past few weeks (I haven't touched them in about a week or so), which were also fun to make up. Below are images of the male horde and then the zombie vixens. The male horde come with tiny bases, so they have been based on 30mm to in-keep with our zombies.


A nice colourful bunch I think you would agree!


Personal Stuff:
I have been building some Mass Effect Armour for fun using a combination of EVA foam tiles and "funky foam" sheets.

I found some templates, so I resized them, and cut them out. I then carved out some areas and covered them over with bits of funky foam (dark black parts) to give more detail.


Once everything was cut out, I used a soldering iron to burn lines into the abs area and chest pieces (the dark lines).

I then used a heat gun (purchased for £15 from Tesco), to heat the foam. It becomes "soft", so I was then able to press it against my body until it cooled down a little. It cools after about a minute.


Finally... Kate (my wife) helped wrap me up in duct tape. That is me in the photo, but I covered my head up with that of Commander Shepard from the Mass Effect games...as my face looked weird. However, I chose an equally weird face to cover mine up with (it's been comically morphed...not by me..).


This isn't some weird fetish, I am making an Mannequin/Manikin of my body so I can easily fit the armour onto it.

It's a simple process:
You wear old clothes, you wrap yourself (or get someone else to wrap you up) in duct tape. That person then cuts your clothes off and you struggle/slide out of the "duct tape skin".

You can see in the image that we cut from the ankle to the knee. and from the wrist to the elbow. We also cut along the spine down to the "tail bone" area.


Now I have to build a "skeleton" so that it can "stand up". Once that's done I can pack it full of stuff (newspaper, old clothes, whatever you want), until it is all "tough". I will make a blog of the next steps :P

Once this is done I can continue with the rest of the armour.

Alrighty then, that's all for now!

Cheers for reading as always :)

Sunday, 18 August 2013

Survivors, Zombies and "not" Doctor Who


I thought I would start by letting everyone know that the WGF Female Survivors are on their way to us, so if you would like to pre order them please send me an email to carl@grekwoodminiatures.co.uk or grekwoodminis@btinternet.com and I will reserve a pack for you. They will cost £15.50 so quite cheap!


For those of you who recognise these, these are from Crooked Dice, but we now stock those on our website too.


For those who didn't see this on my Facebook page, here are some WIP shots of my new zombie range which I should be sending to the caster this month.

They will be on sale sometime next month. Once again, 16 zombies, 8 females and 8 males.


Finally, here's some WIP painting I've been doing. Actually my dad started the "men" but I have taken over them now as he's busy with his work/etc

I've started painting the women up, and added some base tones to the men too.

The idea is we have some rules which my dad wrote for a zombie game. They are basic and are meant as a fast play rule set which is easy to understand and learn. So we need loads of zombies to use in our game!

Righty oh then...no much else to report really! Oh dont forget, if you are on Facebook join our apge and be in for a chance of winning some stuff :)

Cheers as always!


Saturday, 9 February 2013

New Stuff: Zombies, Roads, Buildings and a Bust

It's been a while since I did a blog post, a week and 5 days in fact!

So new releases:

I have uploaded 2 new road packs to the website. This completes the "town" range. The two packs have single yellow lines, and double yellow lines, along with an extra minor side road which has either a cobble style road or smaller paving slabs.

Here are the large photos from the website, I decided to put a car on there for "scale".


Town Centre - Restricted Parking (Single yellow lines)


Town Centre - No Waiting (Double yellow lines)


I still haven't uploaded that snow flock I have... So I must get round to doing that.

Supermarket zombies and building
The supermarket range should be coming back from the painter next week, so my next blog post will hopefully be showing off them all painted.

I have decided to build a local store as well as a large superstore. I am part way through designing the local store. It will have a small staff room, store room (not warehouse) and an office. It will also be the first building that I will be fully furnishing with paper freezers, shelves, veg stands, counters and so forth. The local store will be 12" x 12" in size, perfect for use with our roads (or with other companies products of course!).

Bust
Here's the bust I have been working on. The image is a few days old so it is a bit different now. What do you think? Still early days... and she will have long hair (yes I decided to go with a female), so features are less dominant than what a males would be. If she turns out well I will cast her in resin. I'm going with a mini head wound, a cheek wound, wearing around the mouth, and a neck wound which hasn't been done yet).


Finally..

I think that is all for now... Apologies once again for not getting around all the blogs I usually go through, it's just been a very busy couple of week. January and so far February have been extremely busy with online orders and other shenanigans!

Thanks to all for reading!

Saturday, 8 December 2012

11 Zombies (WIP)

Here's 11 of the supermarket bunch. I have another 5 in progress, so hopefully I can finish them very soon.

From Left: Female warehouse worker in a high vis jacket. Next is a tall (purposely made slightly taller) worker. He is a bit of an everything, so a cleaner, trolley collector, or whatever else they might want him to do! In the middle is a male warehouse guy, again in a high vis jacket. Finally the two on the end are from the office/management of the supermarket.

I have two more office people to finish, and one cleaner which is almost complete.


From Left: Fish Monger! He's a bit torn up. Then a butcher, again he was made slightly taller as I wanted him to be quite a strong looking character. 3rd is a chef with a rolling pin! Now the last 3 are general workers, so cashiers, shelf stacker's and so on.

I have one "cheese counter" type female to finish, and one female worker.


ROADS
They are now available on the website. We plan to release quite a lot of variations of these. So there will be different paths (tarmac, paving slabs etc), different road types, so plain, single yellow, double yellow, etc.

It's to make it easier to customise your own road.

DISCOUNT
There re only 13 days left on the 10% discount. So if you are in need of sculpting putties, or trees for scenery, or glue, or ball bearings, then go check it out.

Cheers.. Comments always welcome!


Saturday, 1 December 2012

10% Discount, and Zombie WIP Photo!


In the spirit of Christmas I have decided to give a 10% discount on a couple of items. They include all sculpting putties, glues/conditioner pens, ball bearings and Trees.

Much of our stuff is already discounted or it is sold relatively cheap, so it's really difficult finding stuff to discount without loosing money. So the trees, being the most expensive items on the website, seem like a good idea to discount, along with the putties as every sculptor/converter needs putties. Glues and ball bearings are just random additions... glue is always useful right?! Also... good glue (which it is) is even better :)

So spread the word if you know of anyone who may be interested in any of those items. Offer ends December 20th.

On a side note, we are working on making some other roads printouts. We are designing ones with paved pavements (instead of tarmac), cobble stone roads etc etc We are thinking of selling them for about £1.50 for 6 road sections and a cool documentation written by me. It's probably worth mentioning that I haven't created the road sections. My dad decided to make some for a wargame he's planning with the zombies. So I've been the printing and testing guy, whilst he's put them together.

Finally, here is some more zombie WIP of two different characters. One is a "Fish Monger" and the other is a general workman/cleaner with a long overcoat. He is bald, and has some sticky out teeth :P

Any thoughts about what he should be dragging (if anything)... I was thinking a fish, but I might leave his hands bare.

Click to ZooOOMM

Until next time, thanks for reading! :)

Saturday, 17 November 2012

WIP Zombies, and Roads...

Once again it has been over a week since my last bog, so here's another one! I don't have a huge amount to talk about as I've just been busy jumping between a few different projects.

I sent off the 4 figures, HammerMan, Princess Bexi, Grekwood in a Fez, and, finally the sci fi alien. They are currently with a caster, but not sure when I'll get those back.

"Roads, where we're going we don't need roads!" (Back to the Future)...
We are currently working on some "road sections" which are designed to be mounted to foamboard (for pavements) and for the base. Although you can use thinner card for the road part. Either way, the pavements have to be on foam board (I guess if you wanted to you could alter it some how).

We plan make them for ourselves, but as I have a webstore, I may as well pop them online in case anyone else would like them! We will make a few different versions, such as tarmac roads with residential style tarmac pavements. Then roads with yellow lines, and then some with paved pathways etc etc. So we should be able to mix and match and get every combo we need.

Next Batch of Zombies: WIP
Here's a little WIP of the current batch of zombies, which is going well. A few of them are finished (such as the ones to the left on black bases). The two in the photo are almost there. The photo is a little old (like a few days), as the two figures have progressed since then. So remember, they are WIP, which means what you see isn't how the final thing will look... It's just a taster.

Clik to zoooOOOOMM

CGD Society Get Together Weekend
Here's a photo of me and Kate from the CGD weekend get together we went to last month... I should have worn the wig... but it was too hot in there! Anyway, who says a pirate can't look after their hair?? :P


Click to zooOOOMM

Ok, that's all for now! Comments as always are welcome :)

Wednesday, 3 October 2012

28mm Scale Hospital Almost Ready!

This is my 40th post. I didn't realise I had posted 40 already! Seems like only yesterday I arrived at blogger.

Hospital PDF
Yesterday I started some work on the hospital building documentation. I really want to just get this sorted and online. So I spent most of yesterday doing it and I managed to finish the instructions for building the ward. Only bits left are the roof, and the joining hallway which I will do in the next day or two. I'm hopefully looking at an upload of the PDF files (there will be 2) next week, early if possible.

When I say 2, I mean one set of instructions, and then another file with all the printouts. The documentation is long, but it is a step by step guide which has step by step photos. Hopefully this will make it easier to follow and construct. I plan to release the hospital as just a building, so no interior furniture.  One day I plan to create some resin furniture to be released at some point in the future but for now I want to get this done quickly as I want to "move on" from the hospital setting and onto different things!

Here's a photo example of one of the steps, so you can see what I mean. I photographed it on my pool/snooker table. I thought the green worked well hehe


Grekwood Sculpt, Dalek Princess and more!
I have decided that when I get the Grekwood sculpt cast, I will put him in a mould with the Dalek Princess (in previous post), 8 figures from a new range, which will include a horse, and then maybe an extra one or two "special" figures, possibly zombie related. No idea when this will be done though, but if I work hard I can aim to get it done before Christmas. When casting figures I tend to fill up the mould as rubber for the mould is very expensive, and it just works out cheaper this way (which as a new hobby/business I need to keep costs down). Maybe when I am established like the big companies out there, I can bring things out quicker! I'm currently working on another 16 zombies, so I will work on everything else here and there.

In case you didn't see my last post, here's the Dalek Princess I am talking about.

Click to ZOOOOM

Kate - She's on TV!
I realised I never gave an update about Kate. Her liver biopsy was confusing and didn't specifically pin point anything. So they gave her some steroids (not those anabolic ones!), and that seems to be bringing the levels down.

On a plus, she went to Tenby (South Wales) yesterday as she is filming as an extra in a TV series which I think will air next year. So gotta watch that to see if I can spot her!

Long hair no more!
After just over a year, I got my hair cut. I went from a pirate look, to more of a Dr Who look, something in-between the current doctor (Matt Smith) and the previous one (David Tennant). It took around an hour to cut (longest it's ever taken). I apparently had so many kinks in it that they had to use a hair dryer (to dry the water they put in), then hair straighteners and tons of spray, all to make it easier to cut and help get rid of the kinks! It looks better now :)

Righty oh, have a great day!

Wednesday, 29 August 2012

Video of the 28mm scale Hospital Building

I have pretty much completed the Basic Hospital and I am pretty happy with the way it's turned out. I was a little bored after I stopped for the day, so I decided to make a video with some interesting music from Mass Effect (first one).


The filming is jumpy, and not "flowy", but it's not meant to be taken seriously, it's just a bit of fun!
 
 
I still have a couple of things to add to the hospital, minor things such as sky lights and roof stuff but by the time I write a new blog it will be complete (that's the plan). I made a mini entrance for this version but I will eventually make a larger entrance/concourse area for bigger versions of the hospital.
 
Ok, so that's all for now. I didn't plan to write a blog today but I couldn't resist posting my ever so awesome (ha!) video hehe
 
On a sad note I have to take my wife to hospital tonight. She needs to have a liver biopsy and will be away for the night (possibly longer...but hopefully not!). Hopefully it's nothing serious and they can sort out why the levels in her liver have been abnormally high the past 2 months. She hasn't been well for the past two month, so I'm hoping this will finally sort things out.
 
So anyway, enjoy the video, and I'll write a new blog in a few days :)
 
Cheers...


Tuesday, 28 August 2012

28mm Hospital almost complete!

Here are some more WIP photos of the hospital I am building.

A day or two ago I decided to finally put a roof onto the building. So I spent part of yesterday putting all the wall pieces together on the computer, printing them out, then glueing them to the ceiling wall sections. So here are the photos.


Front Angle: in the middle of the "link" hallway, I will be putting an entrance door. maybe a small step to get into the building, maybe even a ramp for disabled people (need to cover every possibility!).

Rear Angle: That's pretty much all it is!!
 Front: The entrance will be in the centre. I still need to put the paving stones around the top of the "ceiling wall". There are some already on at the back of the left ward.

Finally here's a photo of how it all breaks down for easy storage. We plan to have 10 wards made (full scale ward for a game (2 story building). So they all stack nicely on the top shelf of a cabinet.


I have had a bit of trouble making this, not because it is complicated, but because the foam board I was using was dodgy. It's meant to be 5mm thick, but I found myself working with 6mm and even 7mm thick foam board (from "The Range"), which varied in thickness from one end to the other. So when putting the building together there are some gaps. Anyway, it's designed for 5mm foam board. So as long as that is used there should be no problems.

My dad bought a few sheets from Hobby Craft about a week ago (it was less than £3 for an A2 size sheet). They are all 5mm, so my dad is helping to build a few extra wards as I'm busy packing (house move), and trying to get a bit of sculpting in here and there. I have build 5 so far, my dad is going to make 4, and I need to make one more to take photos of for the documentation (which is almost written).

Anyway, that's it for now, oh that figure in the photo is a new sculpt, but you probably can't see it that well as it's far away.

Cheers for reading :) I'm hoping to have the "basic" singe story hospital online in September.

Friday, 24 August 2012

Hospital Building Progress

Here are some photos of the hospital. I have positioned them in some different layouts to give ideas of what can be done.

  To the left is the "basic" hospital. I plan to pop the PDF online with one ward colour (grey), and the 3 hallway parts shown (which are shown in grey). It will allow the builder to create a ground floor, 2 ward hospital for smaller games. This is perfect for the "Mega deal" of hospital beds as each ward fits 8 beds (so 16 altogether!).


 An expansion pack will be released later which will include a 4th bit of hallway (the part connecting to the green ward). This allows the ward to go as wide as you like. It will also include a stairs/lifts to get to a further floor, and new wall prints for the "longer hallway" part, which will accommodate for the lifts/stair doors.
As the expansion pack allows you to go wider and taller, I will also provide a "fire escape" stairs to connect to the exterior (left).
Photo to the right shows the the "basic" size, which goes up to a second level. I will also be working eventually on an entrance pack, which will connect to the mid section. It's not essential, it's just something hard core gamers might like as an "add-on".


To the left is the "ultimate" layout. It will have 3 wards along the back, and two wards on the front, and an entrance in the middle. This is the design I am aiming to build, although it will take up


Right: Shows how the lift/stairs and entrance would connect to the centre piece of hallway/corridor.
Finally, an alternate layout which I might do one day. I'm only doing this as a side project when I get bored of sculpting and stuff.


That's all for now with the hospital. I'll probably start uploading stuff to the website for it next month. Ohh totally forgot, so a few weeks ago I was talking about moving and houses all going too quickly. About a week after I wrote that blog, a new apartment popped up online, we went to see it and agreed to it there and then! It has a great sized 2nd bedroom, which is perfect to make as a proper office/workroom. It has a master bedroom with ensuite, main bathroom, and an open plan kitchen/lounge. The lounge is a little on the small side, but it should be good enough to get a sofa and dining table in there (with the TV and bookcase of course!). We get the keys on Sept 6th, but we plan to move in on the 7th. So we've been packing things up, which means a lot of my sculpting/hobby/business stuff has been packed up!! But it's ok, I'm keeping a bare minimum of stuff out to keep me going!

Righty oh then, that's all until next time. Cheers again to everyone who has bought some of the recent items!

Monday, 20 August 2012

28mm Zombie Nurses NOW AVAILABLE!!

Super quick blog just to let you all know I have just uploaded the new zombie nurses with normal heads to the website. So they are now available to buy! :)


I will be uploading 2 more packs of mutants in the next day or two as I just need to finish off the packaging up and so forth.

I'll do a "proper" blog in the next day or two, with updates of the hospital building and the other mutant packs.

Cheers for all the support and encouragement, it means a lot :)

Saturday, 11 August 2012

Zombie Sculpts and Buildings!

To kick start this blog I would like to say a big thank you to Inso (Steven Marchant) for sculpting a tribute miniature in memory of my brother Gareth (aka Grekwood). Here's a photo taken from Inso's blog:

Click to zooOOMM

I will be casting him at some point and he will then be available on the website. Because he is a tribute to my brother, I am thinking of donating some of the profits to the CGD Society, that way it not only helps out Grekwood Miniatures, but it also helps out the charity.

Now I have been working on that Hospital again! I have now completed 4 wards. So here is a photo of them all lined up!

In the photo there is a green, grey, blue and pink ward. They can be stacked on top of each other, or laid flat. If laying flat then there should be a gap between each ward (not bunched together as shown) as there should be a courtyard between each ward with trees and stuff. It is designed to be two stories high (ground and 1st floor) as it is bases on Landough Hospital.

Now some sculpting progress: Here are 3 figures I started the other day, so they are all WIP. 2 males and one female in the middle.The sculpting on these is an improvement on the first batch I ever did. I am making things more defined and including all the detail I can such as a zip on the females clothes. 
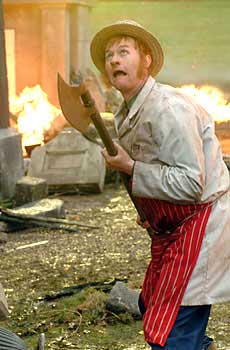
The butcher (above far right) has sideburns like the butcher from "the league of gentlemen" tv show (picture right). I'm not giving him an axe though... maybe a survivor for one of my later planned moulds (I'm looking at next year for that though).


The females are more "curvy"... she got booty... Again the sculpting (in person) resembles that of resin plastic figures, so I take this as a sign of better/smoother more defined sculpting. These figures are going to be more torn up that the other ones, so representing more walkers and stumblers rather than just walkers.   
I'm working on the basis that it goes: Fresh zombie (runner) > walker > stumbler > Crawler > Corpse (just this time it remains that way!). The further right you go the more damaged they are. I'm thinking of bringing out a "specials" mould at some point. But more on that another time :P

Ok I think that's all for now. Oh housing news, we found a different place, loved it, and went for it. We're in the process of sorting out all the paperwork, but fingers crossed there will be no issues! It has a great sized 2nd bedroom, perfect for taking over as a sculpting/business room :)

Ok now that really is all for now! Comments as always are welcome! Cheers for reading :)